Is the GFW rushing year-end KPI? Network has been unstable and I can’t browse Twitter comfortably, so I had to try trojan (which I previously read about but thought was a bit annoying).
2019/12/25 update: too hard. I got it working once by luck, but after reboot it died.
2019/12/26 update: tried again, barely usable. Still don’t understand.
Project: trojan - Github
Different from the common “strong encryption + obfuscation” approach, trojan disguises itself as normal HTTPS traffic.
If you want to pretend to be HTTPS, you need a domain and a certificate.
For a beginner like me, the hardest part is the prep work. Actually configuring trojan is the easiest.
I referenced 7-8 tutorials. The most useful ones:
Trojan Documentation
Trojan搭建教程 - Scaleya
自建梯子教程 —Trojan版本
Trojan:一个伪装成HTTPS的代理工具 - 荒岛
Certbot instructions - Let’s Encrypt
Steps:
- Buy a domain
- Set up DNS
- Get a certificate
- Install and configure trojan
Requirements:
One VPS with ports 80 and 443 open.
Buy a domain
Easy. Free and paid options exist.
This Zhihu answer is somewhat useful: 现在去哪里买 .com 域名最便宜? - 范进的回答 - 知乎
Domain price comparison: domcomp
Just pick a cheap domain or one you like.
Set up DNS
I used CloudFlare and the free plan is totally fine.
- Step 1: create an account. After that it asks you to add a domain; enter the domain you bought.
- Step 2: to use CloudFlare, go to your registrar backend and change
nameservers
Change to the ones CloudFlare provides, like the screenshot (it may differ for each domain).
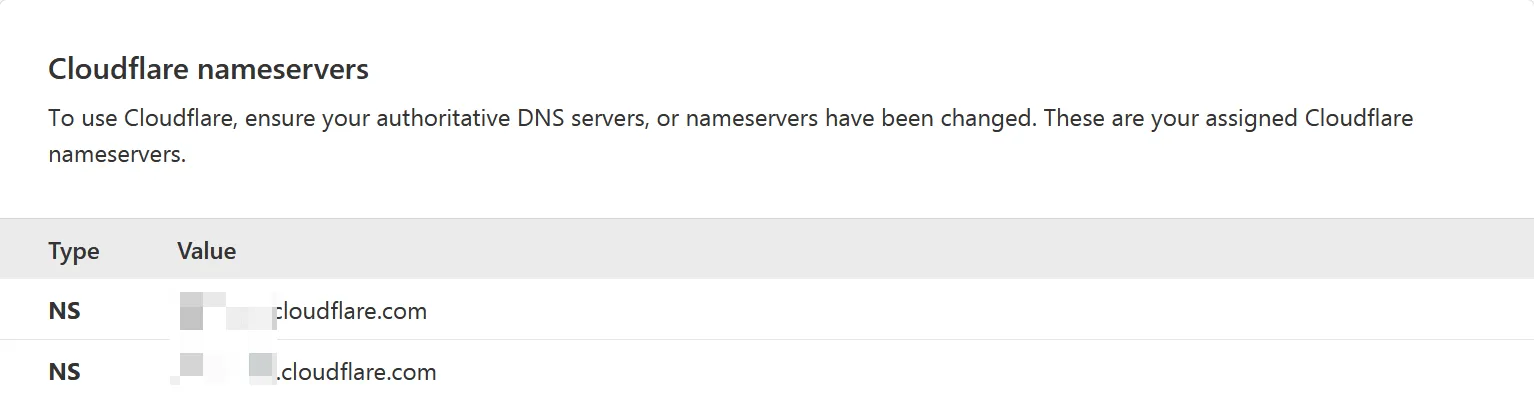
(After changing, it takes some time to take effect. Take a break. For me it was < 10 minutes. - Step 3: in the CloudFlare dashboard, configure DNS records:
Top menu ->DNS->Add record, add anA Typerecord.
Nameis your domain.Contentis the VPS IP.
TheProxy statuscloud must be the greyDNS only. (If it’s orange, trojan will have problems.)
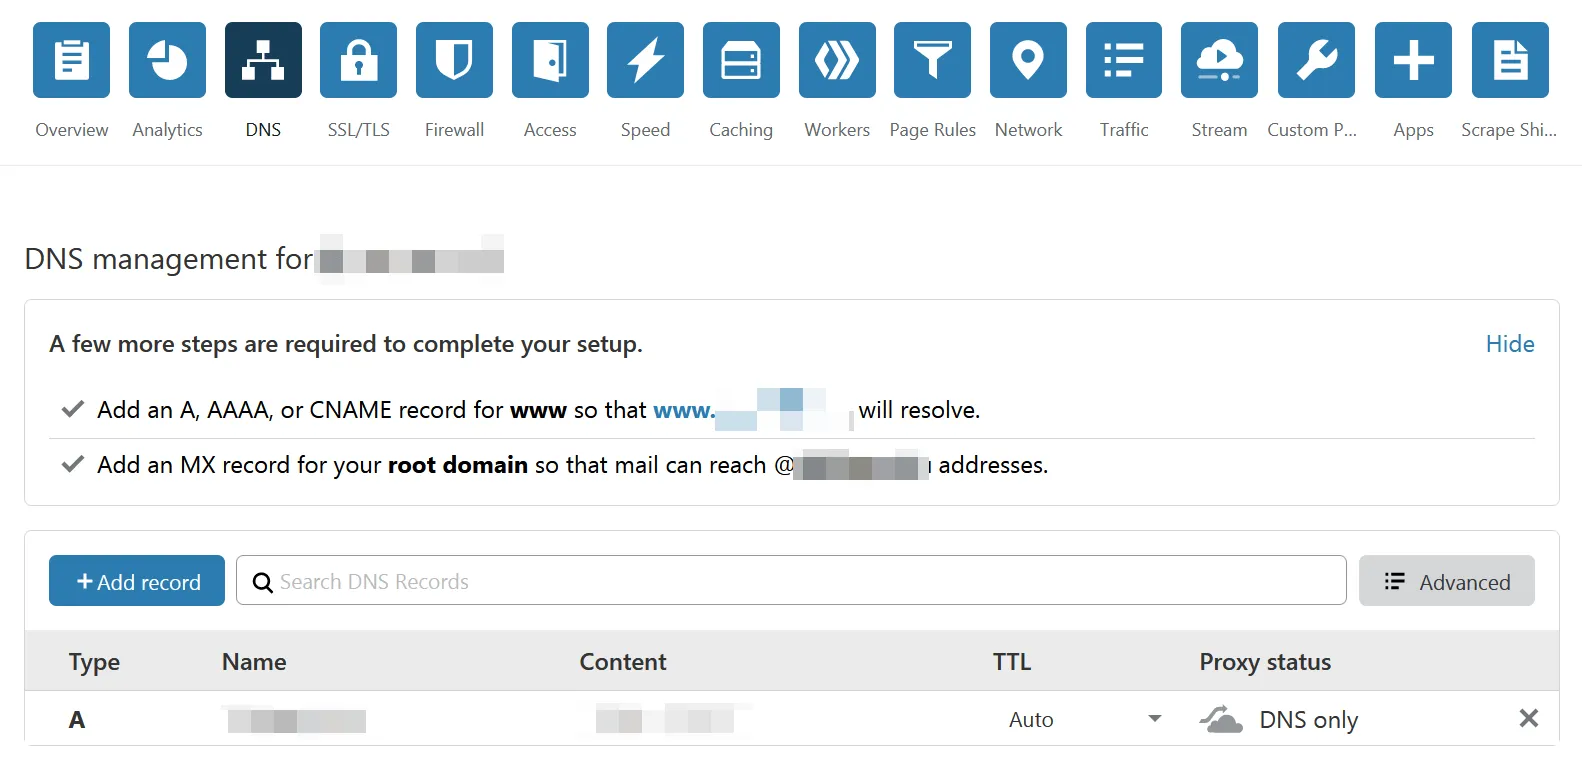
That’s it for DNS.
Get a certificate
At this point it’s reachable but still HTTP. You need a cert on the VPS to upgrade to HTTPS.
Use a cert from Let’s Encrypt because it’s open and free.
Tool: Certbot.
I knew nothing about this part; I just followed Trojan搭建教程 - Scaleya and Certbot instructions - Let’s Encrypt step by step.
- Add Certbot repo
sudo apt-get updatesudo apt-get install software-properties-commonsudo add-apt-repository universesudo add-apt-repository ppa:certbot/certbotsudo apt-get update- Install
sudo apt-get install certbot- Certbot mode? (It asks which service to issue certs for. Among the five options, I only recognized nginx. I picked nginx following the tutorial, and luckily it worked.)
sudo certbot certonly --nginxChoose “cert only”.
Then it asks your email, agree to their user terms, subscribe to newsletter, and finally which domain to issue for. Answer them all.
- Then
certbotsays: great, your cert is issued.
Read the output carefully: you get two pem files, one cert and one key:
/etc/letsencrypt/live/domain/fullchain.pem/etc/letsencrypt/live/domain/privkey.pemThe key is the private key; don’t share it.
Remember the paths; you’ll use them later.
- The Certbot instructions - Let’s Encrypt tutorial also asks you to test auto-renew (certs expire):
sudo certbot renew --dry-runCheck the output; it should be ok.
- The Certbot instructions - Let’s Encrypt tutorial is
so longand at the end it says: let’s verify the cert.
You can use SSL Labs to test your domain. All green, ok.
Long-winded, but finally done.
Next: install trojan.
2019/12/25 update
No idea when nginx got installed on my VPS, so I added the cert for nginx while I’m at it.
For Certbot mode, runsudo certbot --nginx
Follow prompts.
After finishing, open the site in browser. It did becomeHTTPS. Click the lock icon and you can see it’s issued byLet’s Encrypt. ok.2019/12/26 update
sudo certbot certonly --standalonealso seems possible, if you only need the cert.
Install and configure trojan
The official install guide lists install methods for different systems.
There are two quick install scripts:
sudo bash -c "$(curl -fsSL https://raw.githubusercontent.com/trojan-gfw/trojan-quickstart/master/trojan-quickstart.sh)"sudo bash -c "$(wget -O- https://raw.githubusercontent.com/trojan-gfw/trojan-quickstart/master/trojan-quickstart.sh)"Use either. The script output looks like:
Installing trojan 1.13.0 to /usr/local/bin/trojan...Installing trojan server config to /usr/local/etc/trojan/config.json...Installing trojan systemd service to /etc/systemd/system/trojan.service...Reloading systemd daemon...Deleting temp directory /tmp/tmp.eqeWyvKmjN...Done!It says config.json is at: /usr/local/etc/trojan/config.json
Open it with nano /usr/local/etc/trojan/config.json. It should look roughly like:
{ "run_type": "server", "local_addr": "0.0.0.0", "local_port": 443, "remote_addr": "127.0.0.1", "remote_port": 80, "password": [ "password1", "password2" ], "log_level": 1, "ssl": { "cert": "/path/to/certificate.crt", "key": "/path/to/private.key", "key_password": "", "cipher": "ECDHE-ECDSA-AES256-GCM-SHA384:ECDHE-RSA-AES256-GCM-SHA384:ECDHE-ECDSA-CHACHA20-POLY1305:ECDHE-RSA-CHACHA20-POLY1305:ECDHE-ECDSA-AES128-GCM-SHA256:ECDHE-RSA-AES128-GCM-SHA256:ECDHE-ECDSA-AES256-SHA384:ECDHE-RSA-AES256-SHA384:ECDHE-ECDSA-AES128-SHA256:ECDHE-RSA-AES128-SHA256", "prefer_server_cipher": true, "alpn": [ "http/1.1" ], "reuse_session": true, "session_ticket": false, "session_timeout": 600, "plain_http_response": "", "curves": "", "dhparam": "" }, "tcp": { "prefer_ipv4": false, "no_delay": true, "keep_alive": true, "fast_open": false, "fast_open_qlen": 20 }, "mysql": { "enabled": false, "server_addr": "127.0.0.1", "server_port": 3306, "database": "trojan", "username": "trojan", "password": "" }}Change:
- Line 5: replace
127.0.0.1with your domain, e.g."remote_addr": "996.icu", - Line 7: set
password. I only use one password, so I removed line 8 and replacedpassword2 - Line 13, 14: set cert and key paths to the ones you generated earlier
After changes, run trojan to test the config. Fix errors if any.
Start trojan: systemctl start trojan
Common commands:
systemctl start trojansystemctl restart trojansystemctl stop trojansystemctl status trojansystemctl enable trojanFinally, deployment done.
Usage
Go to releases and download the package for your system.
Edit config.json on the client: set remote_addr, password to match the server config.
Double click .exe to run.
Done.
(After two days of usage, I found trojan doesn’t give a significant speed improvement over v2ray (at least for me).
2019/12/25 update
After rebooting the VPS, both v2ray and trojan died…
For v2ray I simplified the config to the minimal one and it came back.
For trojan I messed around for 2 hours, still couldn’t revive it.
The command ./trojan config.json mentioned in macOS: [FATAL] fatal: config.json: cannot open file didn’t help either.
./trojan config.jsonWelcome to trojan 1.13.0[2019-12-25 00:06:21] [FATAL] fatal: config.json: cannot open file[2019-12-25 00:06:21] [FATAL] exiting. . .File perms were 755. What’s the issue?
(one-week trial card for trojna
(Why does BandwagonHost Snapshots blow up two services after a reboot? Weird.
update half a day later
I tried for a few more hours. Installing on another VPS also failed, stuck atCertbot.
Looks like the one successful time above was pure luck.
Leaving it. Maybe I’ll revisit trojan later.
2019/12/26 update
Tried again.
- Changed
config.jsonperms to777, rantrojan:
Welcome to trojan 1.13.0[2019-12-26 09:38:29] [FATAL] fatal: bind: Address already in use[2019-12-26 09:38:29] [FATAL] exiting. . .- Stopped
nginx, ran again:
Welcome to trojan 1.13.0[2019-12-26 09:40:02] [FATAL] fatal: use_private_key_file: key values mismatch[2019-12-26 09:40:02] [FATAL] exiting. . .-
I searched online, didn’t really understand. I tried switching the cert in
config.jsonfromfullchain.pemtocert.pem, and it worked… -
nginxconflicts withtrojan, so I had to stop usingnginx(then how did I run both together before? no idea) -
Switched the cert back from
cert.pemtofullchain.pem, andtrojanstill ran fine -
Changed perms back to
755, still runs -
(So what were the earlier
cannot open fileandkey values mismatcherrors…
Anyway, it works now.
BandwagonHost
Snapshotsis really annoying.
Comments